Color correction is a crucial element in the post-production phase of animation, involving the meticulous adjustment of colors in each scene to enhance the visual impact and align with the animation’s color script and overall vision. This process ensures that the final animation is visually cohesive and effectively communicates the intended mood and atmosphere, creating a compelling visual narrative.
In the modern era of visual content, color is more than just a stylistic element—it’s a powerful storytelling tool. Whether you’re producing YouTube videos, cinematic films, or corporate content, understanding color correction vs. color grading is key to delivering a polished and professional look. In 2025, with increasingly sophisticated editing tools and growing expectations for high-quality visuals, mastering color correction has become essential for content creators.
This blog offers a comprehensive step-by-step guide to color correction, including expert techniques, the best color correction software for beginners, and advanced color grading tips for filmmakers. By the end of this guide, you’ll not only know how to fix colors in video editing, but also how to elevate your visuals to cinematic standards.
Word Count: 1,748 Words
Understanding Color Correction vs. Color Grading
Before diving into the steps, it’s important to distinguish between color correction vs. color grading:
- Color Correction refers to adjusting footage to achieve a neutral, true-to-life look. It involves fixing issues like white balance, exposure, contrast, and color accuracy.
- Color Grading comes after correction and focuses on stylizing the footage, setting a mood, or matching a specific aesthetic with creative color choices.
Think of color correction as preparing a canvas, while color grading is painting the masterpiece.
Why Mastering Color Correction Matters in 2025
As 4K and 8K footage become standard, and viewers consume content across various platforms with different display capabilities, mastering professional color correction techniques ensures consistency, clarity, and quality.
- Inconsistent colors can distract viewers and reduce the professionalism of your video.
- Accurate color representation enhances storytelling and emotional impact.
- Well-corrected footage makes further color grading more effective.
Whether you’re working on documentaries, vlogs, advertisements, or feature films, learning how to fix colors in video editing is a skill that sets professionals apart.
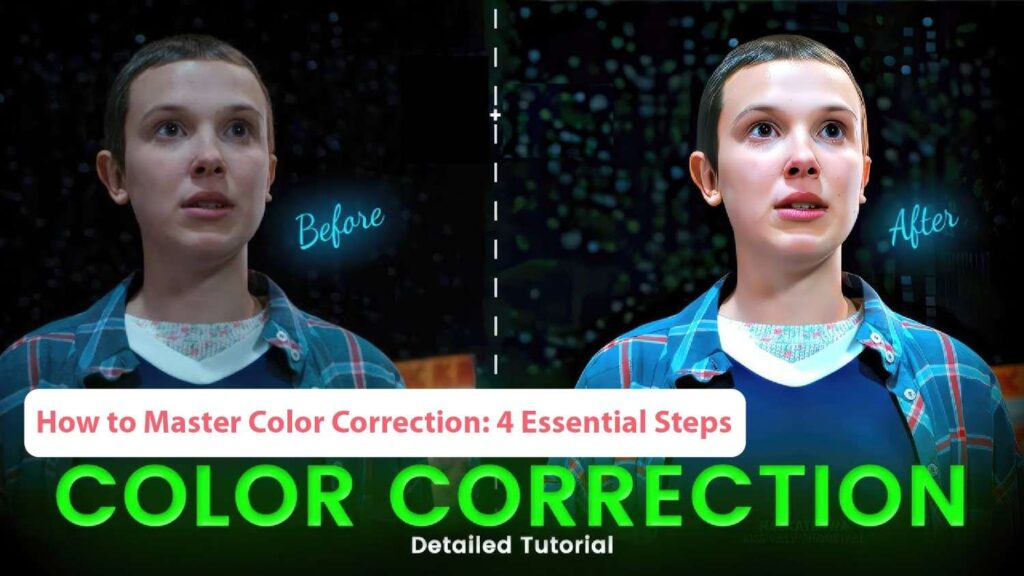
The 4 Essential Steps to Mastering Color Correction in 2025
Let’s walk through the essential step-by-step guide to color correction. These four steps will help you achieve accurate and visually appealing footage.
Step 1: Set the Foundation with Proper Exposure and White Balance
Your first task in color correction is to balance exposure and white balance. This step ensures the footage reflects a realistic lighting and color tone.
Tasks in this step include:
- Adjusting Exposure: Use scopes like waveform and histogram to correct underexposed or overexposed clips.
- Setting White Balance: Correct inaccurate color temperature using eyedropper tools or sliders.
- Fixing Contrast: Ensure your video has a healthy range of shadows and highlights.
Pro Tip: Always correct white balance first before tweaking any color settings. Inconsistent white balance can make skin tones and natural elements look unrealistic.
Step 2: Balance Your Color Channels
In this phase, you’ll even out the color values across your red, green, and blue (RGB) channels. The goal is to neutralize any color cast.
Techniques include:
- Using the RGB Parade: This scope helps identify imbalances in color channels.
- Neutralizing Midtones and Shadows: Skin tones and grays should appear natural.
- Adjusting Tints and Saturation: Avoid overly warm or cool tints unless for creative effect.
This step is vital for a clean, professional look and prepares your footage for the creative phase of grading.
Step 3: Match Multiple Clips for Consistency
In any video project, maintaining consistent color across all scenes is critical. Even with different lighting conditions or cameras, your viewer expects seamless transitions.
Tips for Matching Clips:
- Use reference frames or hero shots to match other clips.
- Utilize comparison views available in most editing software.
- Adjust each clip individually using scopes like vectorscopes for skin tone accuracy.
Advanced Tools: Professional editors use software that supports LUTs (Look-Up Tables) for batch consistency. Matching LUTs can also help maintain a branded visual tone.
Step 4: Final Polish and Creative Adjustments
Once all technical corrections are complete, apply subtle tweaks to enhance visual aesthetics.
Consider the following:
- Add Sharpness and Noise Reduction: Ensure clarity without overprocessing.
- Refine Saturation Levels: Maintain realistic but vibrant colors.
- Apply LUTs for Stylized Looks: Begin transitioning into grading by adding light stylistic effects.
- Export Using Color-Safe Formats: Preserve your color settings when rendering.
Note: Although technically color grading starts here, blending minor enhancements into correction allows smoother visual appeal and professional polish.
Best Color Correction Software for Beginners in 2025
You don’t need to break the bank to start mastering color correction. In 2025, multiple powerful tools exist for beginners and pros alike.
1. DaVinci Resolve (Free & Studio)
- Industry-standard for color correction and grading
- Advanced tools even in the free version
- Ideal for both beginners and professionals
2. Adobe Premiere Pro
- Powerful Lumetri Color panel
- Seamless Adobe ecosystem integration
- Great for creators familiar with Adobe tools
3. Final Cut Pro X
- Mac-exclusive software with intuitive color wheels
- Perfect for fast turnaround projects
4. Filmora Pro
- Beginner-friendly interface
- Useful for learning basic corrections without a steep curve
Choosing the best color correction software for beginners depends on your workflow, device compatibility, and long-term goals.
Professional Color Correction Techniques: 2025 Trends
In 2025, professionals focus on AI-powered workflows and real-time collaboration. Let’s explore a few professional color correction techniques trending this year:
AI-Powered Auto Correction
Many tools now offer intelligent auto-correction features powered by machine learning, which analyze and adjust footage based on scene content and context.
Real-Time Collaboration
Cloud-based editing allows multiple colorists and editors to work on the same project simultaneously, improving efficiency in team environments.
Dynamic LUTs
Modern LUTs adapt to lighting changes and scene mood, enabling smoother transitions without manual rebalancing.
Advanced Color Grading Tips for Filmmakers
Once you’ve mastered the art of correction, it’s time to dive into creative grading. These advanced color grading tips for filmmakers will push your projects to the next level:
Emulate Cinematic Looks
Use cinematic LUTs that mimic popular films like “Dune” or “Blade Runner 2049.”
Create Emotional Impact
- Warm tones evoke comfort and nostalgia.
- Cool tones build tension or melancholy.
- High contrast enhances drama.
Use Masks and Tracking
Apply color adjustments to specific areas or objects in your frame for creative focus.
Experiment with Split Toning
Add different hues to shadows and highlights for depth and visual intrigue.
Common Mistakes to Avoid
Even skilled editors make mistakes. Avoid these pitfalls when learning how to fix colors in video editing:
- Over-saturation: Natural colors are more believable.
- Crushed blacks or blown highlights: Always check your scopes.
- Relying solely on the computer monitor: Calibrate or use reference monitors.
- Skipping white balance correction: It’s foundational to color accuracy.
Final Thoughts: Color Correction Mastery in 2025
Color correction is no longer a luxury—it’s a necessity in the world of video production. From social media creators to Hollywood filmmakers, understanding how to fix colors in video editing through a reliable step-by-step guide to color correction is crucial to crafting compelling visuals.
In this guide, we’ve broken down:
- The difference between color correction vs. color grading
- The 4 essential steps to achieve accurate color
- The best color correction software for beginners
- Tips on advancing your craft with professional color correction techniques
By mastering these techniques and tools, you’ll not only enhance your videos but also elevate your storytelling capabilities, audience engagement, and professional credibility.
Frequently Asked Questions (FAQ’s)
What is a color correction in animation?
Color correction in animation involves adjusting the colors in each frame to enhance visual impact and ensure consistency. This process modifies attributes such as hue, saturation, and brightness to align with the animation’s color script and creative vision. It helps achieve the intended mood and ensures that all scenes visually match.
Who is responsible for color correction?
The color correction process is primarily managed by a colorist, who works alongside the Director of Photography (DP) and the creative team. The colorist’s role is to fine-tune the colors according to the color script and ensure that the animation maintains visual consistency across all frames and scenes, often working with advanced tools and techniques.
What is a color script?
A color script is a pre-production document created by the director or cinematographer that outlines the color mapping, styles, and palettes for each scene in an animation. It serves as a roadmap for color decisions throughout the production, detailing color temperature, tone, contrast, and transitions to ensure that the final animation aligns with the creative vision.
What are the key tools used in color correction?
Key tools used in color correction include:
- Scopes: Tools like waveform monitors, vectorscopes, and RGB parade scopes analyze luminance, color saturation, and individual color channels to assist in precise adjustments.
- Color Wheels: These allow for broad adjustments to shadows, mid-tones, and highlights, and enable selective color changes with secondary color wheels.
- Masking: Techniques to isolate and adjust specific regions of an image for targeted corrections.
- Color Lookup Tables (LUTs): Preset files that apply color transformations for creative effects or stylistic looks.
What is the difference between color correction and color grading?
Color correction is a technical process that ensures colors are accurately adjusted to match the planned color script and maintain visual consistency. Color grading, however, is a creative process applied after correction, focusing on enhancing the animation’s mood and storytelling by adjusting contrast, saturation, and other attributes to achieve a specific aesthetic.