2D Animation Pipeline

Color Correction
2D Animation, 2D Animation Pipeline, 2D Character Design, 3D Animation, 3D Animation Pipeline, 3D Animation Software, 3D Character Design, Animated Video Services, Animation Film, Animation Services, Anime Video Services

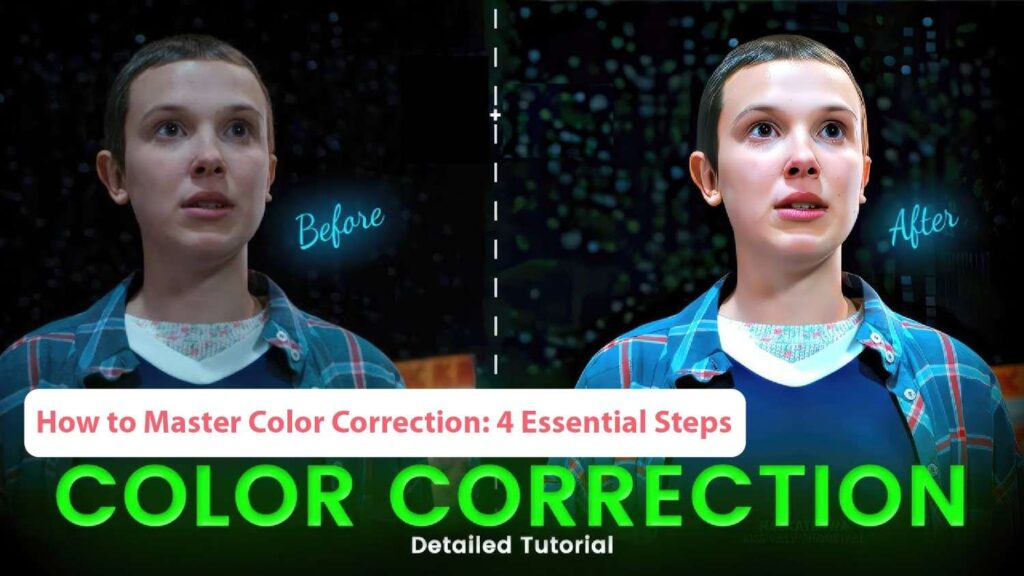
How to Master Color Correction: 4 Essential Steps

Color correction is a crucial element in the post-production phase of animation, involving the meticulous adjustment of colors in each scene to enhance the visual impact and align with the animation’s color script and overall vision. This process ensures that the final animation is visually cohesive and effectively communicates the intended mood and atmosphere, creating a compelling visual narrative. In this article, we’ll delve into the essential stages of color correction within the animation workflow. From pre-production through to the final output, we’ll explore the various tasks involved, and the tools utilized for color correction, and share insights and tips from industry-leading colorists. You’ll gain a comprehensive understanding of how color correction transforms an animation, making it not just a visual experience but a storytelling tool that engages and captivates the audience. Additionally, we’ll highlight common challenges and best practices to help you achieve professional-grade results. Expert Techniques for Color Correction? Let’s begin with the fundamentals of color correction, a crucial step in the post-production process of animation. This task is typically carried out by a colorist, who collaborates closely with the Director of Photography (DP) and the creative team to achieve the desired visual outcome. The colorist’s primary goal is to meticulously adjust the colors of each frame, focusing on three core components of any image: hue, saturation, and brightness. This careful manipulation ensures that every frame contributes to the overall visual impact and narrative cohesion of the animation. The color correction process generally involves several key tasks, performed in a specific sequence to achieve optimal results: While color correction is traditionally considered a post-production stage in the 3D animation pipeline, it is guided by a color map established during pre-production. This color map, often referred to as the color script, outlines the color choices and transitions that align with the animation’s creative vision. In the following sections, we will explore how the color script serves as a foundational tool, influencing every step of the color correction process and ensuring that the final animation aligns with the intended artistic direction. By understanding these principles, you will gain a deeper appreciation of how color correction enhances the storytelling and visual impact of animation within the 3D animation pipeline. Color Script: Each color carries its weight, meaning, and psychological impact on viewers, whether they are consciously aware of it or not. A color script is a crucial pre-production element, typically developed by the director or cinematographer with a profound understanding of color theory. This document provides a comprehensive guide to the color choices and their intended effects throughout the animation. A color script details the specific color mapping, styles, and palettes assigned to each scene and sequence within an animation. Much like a storyboard service, it serves as a technical guide, offering color direction before production begins. This allows the creative team to visualize and plan the overall color scheme and ensure consistency across all scenes. Creating a color script is a highly experimental process. The final document will encompass shot references, color palettes, color temperature, tone, contrast, and guidance on transitions. This detailed approach ensures that the color scheme not only aligns with the animation’s narrative but also enhances the viewer’s emotional experience, providing a cohesive and immersive visual journey. Key Tools and Techniques for Advanced Color Correction Discover the essential tools and techniques that create color correction from basic adjustments to advanced mastery. This guide delves into the cutting-edge software, hardware, and methods used by professionals to achieve precise color grading, ensuring your visuals are vivid, accurate, and impactful. Whether you’re refining film footage or enhancing digital images, mastering these advanced color correction strategies will help you achieve stunning, polished results. 1. Scopes: Video scopes, such as waveform monitors, vectorscopes, and RGB parade scopes, are indispensable tools for color correction. Waveform monitors display the luminance values of an image, showing the amount of light per unit area, which helps colorists adjust exposure and contrast effectively. By ensuring accurate luminance levels, these scopes contribute to a well-balanced image. Vectorscopes provide a visual representation of color saturation levels, enabling precise adjustments to hue and saturation to achieve the desired color values. RGB parade scopes offer a breakdown of the red, green, and blue color channels separately, allowing for targeted adjustments to lift, gamma, and gain for fine-tuning color and tonal aspects. These tools collectively ensure that each color channel is correctly balanced and harmonized. 2. Color Wheel: Color wheels are essential for both primary and secondary color corrections. Primary color wheels control shadows, mid-tones, and highlights, facilitating broad color adjustments across the entire image. Built-in preview monitors show real-time changes as the colorist adjusts each range, allowing for immediate feedback and refinement. Secondary color wheels offer the ability to isolate and adjust specific color ranges selectively. For instance, a colorist might use secondary controls to modify only the greens in an image, providing a high degree of flexibility during color grading. This targeted approach allows for nuanced color corrections that enhance the overall visual impact. 3. Masking: Masking techniques allow for precise color correction by isolating specific areas of an image. Colorists can apply adjustments to color, exposure, and brightness within the masked regions only. Tracking masks follow moving objects, enabling dynamic color corrections that adjust as the scene progresses. This functionality is essential for maintaining consistency and accuracy in animated sequences. 4. Color Lookup Tables (LUTs): A LUT (Lookup Table) is a preset file that applies a color transformation to footage, akin to a color filter. LUTs modify the pixel values in the original shots, applying predefined color adjustments to achieve a particular look or style. They streamline the color grading process by providing a quick way to apply complex color effects. There are two primary uses for LUTs. Creative LUTs offer a quick way to impart a specific aesthetic or visual tone to your footage, such as cinematic, vintage, or fantasy styles. Applying a creative LUT can instantly give your footage a distinctive appearance, simulating the look of

2D VFX in 3D Animations
2D Animation, 2D Animation Pipeline, 2D Character Design, 3D Animation, 3D Animation Pipeline, 3D Animation Software, 3D Character Design, All, Animated Presentation, Animated Video Services, Animation Film, Animation Services, Anime Video Services

How 2D VFX Helps Create Perfect 3D Animations More Efficiently and Effectively

You might associate VFX primarily with 3D visual effects like explosions, fire, smoke, or tornadoes. Still, there are numerous cases where 2D VFX is skillfully integrated to create iconic and visually striking shows, such as Arcane and Riot Games cinematics. 2D VFX brings a more organic, hand-drawn quality to a scene, enhancing the visual storytelling with unique stylistic elements. While 3D techniques dominate the visual effects industry today, 2D effects remain vital in animated productions, offering a distinctive aesthetic that complements modern techniques. This article will explore various examples and techniques for 2D VFX, their application in different genres, and their significance within the animation production pipeline. We’ll also discuss how combining 2D and 3D elements can result in a more dynamic and immersive visual experience, showcasing the strengths of each approach. Why do we use 2D VFX in 3D animations? Opting to simulate effects in 2D is largely due to the efficiency it offers, as creating these effects in a 2D application takes significantly less time and effort compared to using 3D software, especially in the later stages of a project. 2D VFX can be incredibly useful for correcting imperfect shots. While the production crew strives for flawless execution, addressing issues with 2D VFX during post-production is often far more cost-effective than spending hours reworking or re-rendering scenes. The role of a post-production team in an animation studio is to elevate a project from the production stage, enhancing it with 2D visual effects and color correction to create a truly outstanding final product. With 2D VFX, studios can also achieve a wide range of stylistic effects that may not be feasible in 3D. This flexibility allows for greater creative expression while maintaining budget efficiency. Ultimately, it ensures the final output is visually captivating and polished. The Future of 2D VFX Animation As technology merges with creativity, the prospects for 2D VFX animation appear bright. Innovations in AI, machine learning, augmented reality (AR), and virtual reality (VR) are poised to transform the animation landscape, creating fresh opportunities for innovation and storytelling. These advancements empower artists to push creative boundaries, creating immersive experiences that captivate audiences. The fusion of cutting-edge tools and artistic vision will redefine how stories are told, making the future of 2D animation even more exciting. Comparative Table: Feature/Aspect Traditional 2D VFX Modern Digital 2D VFX Techniques Used Unique, artistic quality with a human touch. The visual style is often specific to the artists’ capabilities. Digital compositing, computer-generated imagery (CGI), digital rotoscoping. Tools Pencils, inks, paints, celluloid sheets, optical printers. Software like Adobe After Effects, Nuke, Toon Boom Harmony. Flexibility Limited by the artist’s skill and physical materials. Changes can be time-consuming and costly. High flexibility with the ability to easily modify effects, colors, and textures. Speed of Production Time-consuming due to the manual labor involved. Each frame must be created and processed by hand. Faster production times due to digital tools that streamline the creation and editing process. Cost Potentially lower initial costs for materials but higher labor costs and longer production times. Higher initial costs for software and hardware, but reduced labor costs and shorter production times. Visual Quality Unique, artistic quality with a human touch. Visual style is often specific to the artists’ capabilities. Consistently high-quality visuals that can be adjusted to match any artistic style or requirement. Revisions and Edits Challenging and time-consuming. Often requires redoing work from scratch. Easily done within the software, allowing for multiple iterations with minimal additional effort. Scalability Difficult to scale for large projects due to manual processes. Easily scalable for projects of any size, thanks to digital workflows. Realism and Integration Achieving realism can be challenging and depends on the artist’s skill in mimicking real-world physics and light. Advanced tools and algorithms enable highly realistic effects that can seamlessly integrate with live-action footage. Accessibility Required extensive training in traditional art techniques and access to physical materials. Accessible to a wider range of creators with varying skill levels, thanks to intuitive software and online tutorials. 2D VFX as a Part of Pipeline You may be familiar with 3D VFX and its role in the 3D animation pipeline, but 2D visual effects offer a different approach. From the background and skillset of the artists to the tools and techniques used, 2D VFX operates distinctively. Ultimately, both 2D and 3D VFX aim to create stunning and unique effects that enhance a scene in animation. 2D VFX, specifically, is integrated during the post-processing stage of a 3D animation, alongside tasks such as composition, color correction, and final rendering. Unlike 3D effects, which utilize a three-dimensional space, 2D visual effects are created on a flat plane. Artists paint intricate textures and employ the 2D canvas to introduce depth and visual interest, adding hand-drawn elements like smoke, dust, water, and magical effects to achieve a distinctive, hand-created look. Incorporating 2D VFX can add a layer of artistic flair and detail that complements the 3D elements, enriching the overall visual experience. This blend of techniques allows for a dynamic interplay between different visual styles, resulting in more captivating and immersive animations. By understanding the unique contributions of 2D VFX, you can better appreciate how these effects enhance and create animated productions. Essential Tools and Techniques of 2D VFX for Creating Stunning Visuals Artists have access to a range of programs and tools that can serve as a dynamic workspace. Photoshop is ideal for digital painting, After Effects excels at adding particles and simulations, and Blender’s Grease Pencil allows for the creation of two-dimensional effects. These tools offer versatile functionalities that can enhance the creative process, providing artists with the means to achieve a wide type of visual effects. Whether you’re adding intricate details, creating dynamic simulations, or integrating 2D effects into a 3D environment, these programs facilitate a high level of artistry and precision. Let’s delve into various 2D VFX techniques and explore their applications in animation, examining how these methods contribute to the overall visual storytelling and artistic impact of animated projects. 1.

2D Animation Pipeline
2D Animation, 2D Animation Pipeline, 2D Character Design, All, Animated Video Services, Animation Film, Animation Services, Anime Video Services, Video Production Service

2D Animation Pipeline: A Detailed and Complete Production Process

Animation has evolved significantly from its beginnings in hand-drawn cartoons. Whether you’re working on a brief short film or a feature-length project, creating a 2D animation involves a comprehensive process spanning multiple stages: pre-production, production, and post-production. The 2D animation pipeline outlines the typical workflow and stages necessary to bring a 2D animated film or project to life. Although the journey from the initial concept to the final product is extensive, it is ultimately a gratifying one. Each stage requires meticulous attention to detail, creativity, and collaboration among various artists and technicians. Understanding this pipeline is crucial for anyone involved in animation, as it ensures a smooth transition through the complex steps of creating compelling and visually engaging content. From initial storyboarding to the final polish, every phase contributes to the overall quality and impact of the animation. In this post, I’ll delve into the intricacies of the 2D animation pipeline and what it entails. Key Components of the 2D Animation Pipeline – Essential Stages and Techniques So, how many steps are involved in the 2D animation production process? Let’s take a closer look at the typical stages of the 2D animation pipeline and what goes on behind the scenes. From the initial concept and storyboard to the final touches and post-production, each phase plays a critical role in shaping the final product. Understanding these steps provides valuable insight into the detailed and collaborative nature of animation. Join me as we explore the comprehensive journey of creating a 2D animated project. Pre-Production in 2D Animation Pipeline The pre-production phase encompasses several crucial stages in the 2D animation pipeline: 1. Idea Generation: The process begins with the generation of an idea, which serves as the foundation for the entire project. Before any frames are drawn, the concept must be fully developed and visualized. This initial idea is the driving force behind the animation ideas, providing both direction and purpose. Creating a compelling concept is essential, as it will guide the style and tone of the animation. Once the idea is established, it’s important to determine the appropriate style and tone. Whether the concept calls for an energetic, exaggerated appearance or a more delicate, hand-painted aesthetic, the art direction should align with the core idea. This ensures that the visual approach enhances and supports the overall concept. Additionally, solidifying the concept early helps streamline the subsequent stages, making the transition from idea to animation more cohesive and effective. 2. Script Writing: In 2D animation, the script is essential for converting abstract ideas into concrete words on a page. This step is crucial for shaping the narrative before it is brought to life through animation. A well-created script serves as the foundation for the entire project, providing the structure and direction needed for the film to flourish. As the script evolves through various drafts, the story becomes more defined and tangible. Animation Scriptwriting is the pivotal first step in transforming imaginative concepts into a structured narrative, guiding the animation process from inception to its final, fully realized form. It sets the stage for character development, plot progression, and dialogue, ensuring that every element of the animation aligns with the intended story arc. A strong script not only outlines the plot but also inspires the visual and emotional aspects of the animation, helping to create a cohesive and engaging viewer experience. Additionally, a well-developed script serves as a reference point for all subsequent stages, from storyboarding to animation, ensuring consistency and clarity throughout the production process. 3. Storyboarding: Animation storyboarding is a pivotal stage that brings the script to life visually, setting the stage for full production. This process involves creating a series of panels that depict the script scene-by-scene, similar to a comic book. Story artists play a crucial role here, as they illustrate each scene to visualize the storytelling and ensure that every detail is captured before production begins. The storyboards provide a comprehensive visual outline of the film, showcasing: By providing this detailed visual roadmap, storyboards enable the director and the production team to evaluate the story’s flow, scene pacing, and continuity. This visual blueprint serves as a reference throughout the production process, ensuring that the final animation maintains coherence with the original script and narrative vision. Storyboarding is essential for identifying potential issues early on and making adjustments before the more time-consuming stages of production commence. 4. Animatic: In 2D animation, animatics serve as a preliminary assembly of the film, incorporating basic motion and audio elements. They combine storyboards, rough animation sequences, preliminary voice recordings, music, and sound effects into a cohesive moving story reel. Although the visuals in animatics are still rough, they provide a crucial first glimpse into the film’s rhythm and storytelling impact. This stage is essential for evaluating the pacing and staging of the film, allowing for important adjustments before proceeding to full animation. Animatics also help in identifying potential issues with the narrative flow and visual coherence early on. Essentially, animatics act as a bridge between static storyboards and the final animated footage. They bring the film to life in a dynamic way, offering a rough cut that transforms plans from paper into a more engaging and fluid visual experience. By refining the story and making necessary changes, animatics ensure that the final animation will effectively convey the intended narrative and emotional tone, setting a solid foundation for the subsequent animation phases. 5. Concept Art: Concept Art refers to the initial visual representations of ideas and designs for various creative projects, such as video games, films, animations, and more. This form of artwork is crucial for visualizing and developing the look and feel of a project before it moves into production. Concept art serves as a blueprint for designers and artists, helping to define the overall aesthetic, character designs, environments, and key visual elements. Key Aspects of Concept Art: Finalized character model sheets provide comprehensive templates that include proportions, turnarounds, and detailed expressions and poses. Concept artists also create color keys to define lighting,

Scroll to Top